Ending of the Term

The term is ending very soon. I’ll be continuing on the project as part-time till early next year and we do have few other directions potentially can go.

Iteration Blending

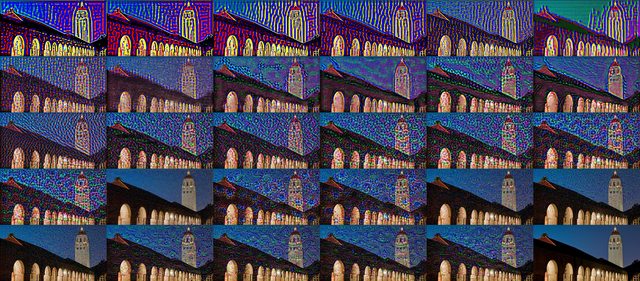
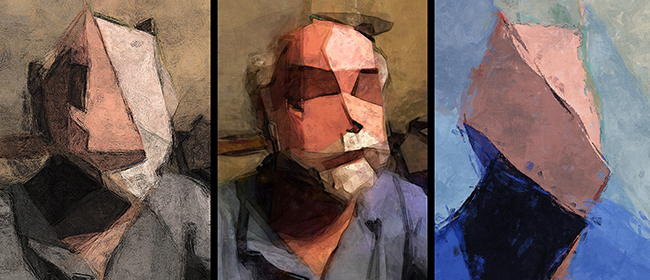
The blending based on iteration is fully functional. If the configuration requires 10 iterations in total to dream on one frame, the blending algorithm will dream 1 time for style A, then 9 times for style B. Next frame, the logic will apply 2 times A style dreaming and 8 times style B dreaming. This pattern continues until the style fully moved from style B to A. Right now a recursion algorithm is applied to implement this idea. Performance is not that good where roughly takes 10 seconds to finish a 10 iteration frame (2 passes). The result is much improved in regard to the ghost effect of the alpha blending technique.

Refactoring & Python

Some heavy refactoring is taking place recently and few interesting observations are done. Python does offer fairly strong support for scientific researching with easy API for image processing, video analysis, high dimensional array. However, so far my experience with it is still bad. The style of the programming is more like a quick mockup to implement an idea rather than seriously taking care of the integrity of the code.

One example can be the epic indentation logic to decide code block. For a giant nested control statement like if, for etc. It is quite likely the ending become chaotic where statements are floating around and no clue who belongs to who. For me, this is purely a design flaw that I gain nothing while only introducing trouble later to maintain. And my conclusion is based on that a good design is able to produce robust code logic not only for now but for future reference while simplified syntax is ONLY a bonus if the earlier foundation can be laid properly.

for x in range(0, n):
    # Do some stuff here...
    for y in range(0, n):
        # Do other stuff here...
        if foo is None:
            # Keep doing stuff...
    # Indentation here will be confusing who it belongs to.<span data-mce-type="bookmark" style="display: inline-block; width: 0px; overflow: hidden; line-height: 0;" class="mce_SELRES_start"></span>

Variable Parameter Passing

In Python, *args and **kwargs can be used to pass an indefinite number of parameters to a function in the function definition. This feature is also common for other programming languages. It helps some scenarios where the input of the function cannot be predetermined but still following a pattern. For example, a function converts a string user input to a book title style with uppercase staring characters. To simplify the logic, a user can separate an arbitrary number of strings and pass as parameters instead of containing them in a collection object, say array or list. Specifically, this logic is introduced in our dreaming code:

dreamed_frame = deep_dream(
            net,
            input_frame,
            image_type=image_type,
            verbose=verbose,
            iter_n=int(key_frames[i].iteration.first),
            octave_n=int(key_frames[i].octave.first),
            octave_scale=octave_scale,
            step_size=stepsize,
            jitter=jitter,
            guide_image=guide_image,
            end=end_param,
            )


def deep_dream(
    net,
    base_img,
    image_type,
    iter_n=10,
    octave_n=4,
    octave_scale=1.4,
    end='inception_4c/output',
    clip=True,
    verbose=1,
    guide_image=None,
    **step_params
):<span data-mce-type="bookmark" style="display: inline-block; width: 0px; overflow: hidden; line-height: 0;" class="mce_SELRES_start"></span>

    # Do stuff...

        for i in xrange(iter_n):
            make_step(net, end=end, clip=clip, guide_features=guide_features,
                      **step_params)

    # Do stuff...

For the code above, the “deep_dream” function is called with procedure “make_step” inside. In line 27, the “step_params” is defined can be multiple parameters and directly passed to the “make_step” procedure in line. The actual parameter passing is in line 12 where the “end_param”.

One good thing about this is it makes calling function able to separate the immediate parameters with the ones will be passed later to other nested functions. For example, in a real-life cookie making scenario, Annie is dedicated to cookie making while Joe is dedicated to plate cleaning. If I want a plate of cookies, the traditional way is asking Annie:

“Hi, Annie, would you make a plate of cookie for me with powder A, salt B, blueberry C, plate D, kitchen cleaner F, and paper towel E?”

Annie accept the task then ask:

 “Hi, Joe, would you prepare me a container with plate D, kitchen cleaner F, and paper towel E?”.

Later on, Annie will be able to make the cookie with the plate Joe prepared. To use the variable parameter, I will ask:

“Hi, Annie, would you make a plate of cookie for me with powder A, salt B, blueberry C, and stuff for Joe?”

The stuff for Joe will contain “plate D, kitchen cleaner F, and paper towel E” which Annie is not sure about due to her dedication to cookie making. Then, Annie can acquire the plate by asking:

 “Hi, Joe, would you prepare me a container with stuff I got from Wei?”.

Essentially, the same scenario can happen in the programming world. The variable parameter allows programmer passing parameters without knowing the actual content of them which are encapsulated inside the *args pointer. This reduces the risk that mistakenly using the parameters since the validation will be done in the nested functions, Joe.

However, there are few drawbacks too with this idea. First, the programmer will be hidden from the passing parameters. If something is wrong and the programmer is forced to dig into the nested function, Joe, it is difficult to debug since which parameter is passed is unknown and all appended to that pointer. Second, the nested logic is not recursive. Say I pass the information, ingredient, plate, and water switch to Annie, Annie pass plate and water switch to Joe, Joe cannot pass the same thing, plate, water switch to plumber Smith but have to trim the plate and only pass the water to Smith. Although the trim can be done in advance with a nested pointer at the beginning, it is just too much trouble.

In conclusion, this variable parameter is more likely have no special application than the typical scenario other programming language offers. Say, an undetermined number of user input needs to be handled. And from my past experience, this situation is not that common. The particular case we have in the deep dreaming algorithm seems not really on point to practice the variable parameter idea since the input is fixed and the drawback of such implementation is more significant.

Named Tuple

In mathematics a tuple is a finite ordered list (sequence) of elements. An n-tuple is a sequence (or ordered list) of n elements, where n is a non-negative integer. There is only one 0-tuple, an empty sequence. An n-tuple is defined inductively using the construction of an ordered pair. — Wikipedia

One example is a Point(x, y) can be a tuple consist of x and y value. Python example can be found as follow:

# Declare and instantiate tuple.
tup1 = ('physics', 'chemistry', 1997, 2000);
tup2 = (1, 2, 3, 4, 5);
tup3 = "a", "b", "c", "d";

# Access tuple.
print "tup1[0]: ", tup1[0];
print "tup2[1:5]: ", tup2[1:5];

This feature can be very helpful for some light weighted object say a point, instead of creating your own object, just use a tuple. However, one problem is the naming is less convenient since p[0] has little connection with x coordinate of a point. The solution is named tuple:

from collections import namedtuple
Point = namedtuple('Point', 'x y')
pt1 = Point(1.0, 5.0)
pt2 = Point(2.5, 1.5)

# Compute displacement from two points.
from math import sqrt
line_length = sqrt((pt1.x - pt2.x) ** 2 + (pt1.y - pt2.y) ** 2)

One thing about named tuple is that it is likely always better than the nameless tuple. Unless it is in a context impossible to name the tuple. To utilize this feature, now all the keyframes are built in named tuple so frame[i].iteration.first and frame[i].iteration.second will be the two weights for the iteration blending mentioned at the very beginning.

In contrast, C++ seems to have the similar idea to encapsulate in a light-weighted object while Java, as expected, does not have. It is more like a culture thing that Java tends to be robust while rarely predict the specific user scenario. So Java users are expected to implement their own light-weighted object for the tuple, at least pair (xxx.first & xxx.second).

AI Creativity Meeting

The painting project made some progress recently. It now supports linear keyframe interpolation on iteration, octave, layer, and model. The video clip can relatively transit from one style to another. However, temporal coherence is still an issue to be solved. The entire creative team gathered recently which lead to another deeper solution potentially to help all the existing issues.

Deep Dream Basics

The essential idea how deep dream apply the style to the image is quite simple. The algorithm run over an image array and generate RGB delta of each pixel based on the original value. Then, this value is recursively enhanced by apply same technique again and again. Essentially, the out equals to original pixel value plus deep dream delta.

Deep Dream Iteration
Different iteration applies texture recursively on the same image.

Image Blending Issue

Based on above information, instead of using alpha blending on two generated images, which can lead to significant “ghost” artifacts, we can simple dream on different style with various iterations. For example, instead of alpha blend two images from style A, 70% alpha, 10 iterations to B, 30% alpha, 10 iterations, we can simply apply A style iteration 7 times, then B style iteration 3 times recursively on the same image.

The only issue about this new method is the order of the iterations. They can be mixed ABABA, BAAAA or BBBAA, AAAAA or AAAAA, AABBB. The results from these methods will be different. An evaluation of the results will be required after the code is done.

Temporal Coherence

This issue has already been addressed again and again. Previously, by using optical flow to direct the dreaming is regarded to be one of the best solutions. However, detailed implementation is unknown. Now, we can finally apply the vector results from the optical flow to the deep dream delta result to redirect the result.

One concern is we still want the dream progress based on time. For example, if a sun moving from left to right, the expected results say a flam texture is gradually evolving while the sun is moving instead of a fixed texture on the location where the sun is. In that way, one evaluation must be done to test will slight different from the source image make a huge change for the final dreamed result. Only if it is negative, we might further utilize the optical flow method mentioned.

AI Avatar Meeting

I also attended the other meeting about an AI avatar program, an immersive talk bot. Few challenges are addressed there including:

  • Implementing more XML command to adjust talking environment light, avatar body movement etc.
  • Build a queue system to handle multiple gestures if they overlap together
  • Research potential solution move the project to Unity

In the future, I may also help out the team to do some programming about above issues.

Fresh Code

It didn’t take a long time to setup my dev environment. After the remote connection is done, which I have to do since the lab is running on some high-end CUDA machines, few well-labeled programs are gathered my own folder. A quick test is run against a sample video to separate it into frames, apply deep dreaming on the frames, then assemble the frames with sounds back to a dreamed video. The process takes few hours for ~1000 frames and the result is fine.

Steve in Deep Dream
An image of Steve done by deep dreaming. The original video footage cannot be published for now.

Iteration & Octave Interpolation

As mentioned in the previous post, iteration and octave are added by a new parameter pointing to a CSV file as follow:

frame,iteration,octave,layer
33,15,5,Layer
66,5,30,Layer
99,30,10,Layer

These values then can be interpolated linearly or by other models to generate a tuple list with the corresponding iteration, octave, layer (not implemented yet). Every two rows will be processed in one iteration which marks the start and the end of one keyframe section. One trick here is if the first keyframe is not starting from frame 1, the assumption is made that anything between frame 1 and this keyframe will have same iteration, octave, and layer. Same thing applies to the last keyframe and the last frame. The code sample is as follow:

# Must add one extra since frame start from 1 rather than 0
keyFrames = [(iterations, octaves)] * (int(totalFrame) + 1)
if key_frames is not None:
    with key_frames as csvfile:

        # Get first line to decide if the first frame is defined
        reader = csv.reader(csvfile, delimiter=',', quotechar='\'')
        reader = csv.reader(csvfile, delimiter=',', quotechar='\'')
        next(reader, None) # Skip the header
        firstLine = next(reader, None)
        if firstLine[0] != '1':
            previousRow = firstLine
            previousRow[0] = '1'
        else:
            previousRow = ''

        # Rewind the reader and read line by line
        csvfile.seek(0)
        next(reader, None) # Skip the header
        for row in reader:
            if previousRow != '':
                interpolate(keyFrames, previousRow, row, 'Linear')
            previousRow = row

        # Check last line and end interpolation properly
        if row[0] != str(totalFrame):
            lastRow = row[:]
            lastRow[0] = str(totalFrame)
            interpolate(keyFrames, row, lastRow, 'Linear')

After these sections are prepared, interpolation function is called. Currently, only the simple linear model is implemented where more advanced ones can be introduced in the future. One thing should keep in mind is that frame always starts from 1 rather than 0. The code sample is as follow:

def interpolate(
    keyFrames,
    previousRow,
    currentRow,
    method
):
    iterationFragment = (float(currentRow[1]) - float(previousRow[1])) /\
                        (float(currentRow[0]) - float(previousRow[0]))
    octaveFragment = (float(currentRow[2]) - float(previousRow[2])) /\
                     (float(currentRow[0]) - float(previousRow[0]))
    for i in range(0, int(currentRow[0]) - int(previousRow[0]) + 1):
        iteration = str(int(float(previousRow[1]) + i * iterationFragment))
        octave = str(int(float(previousRow[2]) + i * octaveFragment))
        keyFrames[int(previousRow[0]) + i] = (iteration, octave)

About Python

Apparently, I’m a Python hater 😀 One advice I’m always giving is do not start your programming career with Python. Reseason behind this is Python is such a different language compares to C-like style, fully adapt to Python will cause people difficult to move to other languages, i.e. I have friends tend to keep forgetting a variable need a type and how type casting works when moving from Python to others.

Other things are just pure basics, indentation rather than {}, don’t need to declare a variable before using it, no strict type. It literally dodged every single criterion where I think a good programming language should have. However, its “simplicity” and some well-supported science libraries made it gaining popularity in the research world. Nevertheless, one thing I learned from the past is if you are seriously thinking to work with one language style, you’d better choose the one pleasing you when writing.

Getting Started

Future System

Steve readdressed our current development with few sample, also ran few tools we use to generate arts and videos. Eventually, a more clear image is set that in the future, our program should generate painting in real time based on captured video while responding to user emotion. Few issues are addressed:

  • Our current advantage in this field is generated art based on parameters which lead to being able to alter video results based on the input. Not implemented yet but possible
  • For a real-time application, performance is a key issue. Our current videos are not generated in real time but we do optimize the result by generating one result every three frames. Users had feedback that the art displayed in this rate is better visualized compare to one result per frame due to having more time to experience the work
  • Our current result is lacking temporal coherence. Users experience flicking, discontinuing of texture on moving object during the video. This issue might be resolved by applying generation based on optical flow. An interesting video can be found here:

Work to Do

Comparing to optical flow and temporal coherence, I’m more familiar with the solution to make our current video generating program able to respond to the parameter change. The task from now on is adding an API so the program can read parameters from a text file and output results accordingly.

Our current program generates frames from a video in a for-loop by calling a DeepDream routine:

DeepDream(Layer, Guide, Iteration, Octave);

The layer parameter controls which layer the neural network is considered to paint on the canvas, i.e. most likely how the final pattern looks like. The guide controls which portion of the nodes within the layer is prioritized. Iteration controls how heavy the output is altered, the more iteration the more deviation from the final result to the original input. The octave controls the size of the style patch. Larger octave will generate a larger patch.

First Step

Our program currently iterates through all frames by a same hardcoded set of parameters. The first step is updating iteration and octave based on keyframe interpolation. For example, if users assign iteration 10 at frame 1 and 20 at frame 5, then the program must interpolate at frame 3, iteration will be 15 if by linear. The interpolation can be linear, cubic etc. which is based on user choice. One issue here is the interpolation may generate float iteration or frame which must be rounded. This may lead to the final frames jump from one to another lacking of smoothness.

Second Step

The layer and guide should be updated dynamically similar to above. One key difference here is the generated result must be blended since the change will be dramatic. Steve proposed few simple alpha blending solution but I feel we can utilize more advanced blending based on total pixel difference which was covered in my previous computer graphics study. This part is more challenging and also more rewarding. If it can be solved properly, it can also help the float frame issue in step one, even resolve the flickering issue mentioned at the beginning.

Overall I’m quite happy that having a very concrete discussion with Steve today and sorted out the later tasks. Steve not only convey his idea but also talked about some very detailed implementation. I think in the future, only the high-level requirement is necessary to just save some effort. Plus, the alpha blending is really a relief for me since the expectation of our next implementation is not that high. Multimedia and image processing really laid a great foundation of the language we use here in computer graphics today.

First Meeting

Journey Start

My directed study was approved recently. The topic is about teaching A.I. mimic classical paintings such as Van Gogh, Monet etc. We briefly discussed current research of SFU iVizLab on this topic and visualized some of the generated results which are quite different to what I previously studied.

Deep Learning

Deep Learning
Deep Learning

In our research, deep learning is applied extensively. It consists of decision-making with the multilayer of nodes. One example from above figure can be “Identify Animals”. The first set of four nodes at left which is the first layer can have some very primitive questions, each answer of the question is a vertex between first layer node and second layer nodes. The last layer is the final answer which is what animal is this image represented. The weight of each vertex can vary to decide how accurate the answer from the previous question is. For example, questions can be as follows:

  • First Layer
    • The image has color?
    • The image has clear intensity change?
    • The image contains limited noises?
    • The image is in a reasonable size?
  • Second Layer
    • The image contains liquid structure like water?
    • The image contains column structure like legs?
    • The image subject is small?
    • The image subject has fur texture?
  • Third Layer
    • The image contains many leg structures?
    • The image contains what pattern on the fur texture?
    • The image contains eye structure?
    • The image contains nose structure?
  • Fourth Layer
    • The image is a portrait of a fish
    • The image is a portrait of an elephant
    • The image is a portrait of a dog
    • The image is a portrait of an insect

In this case, A.I. can answer these questions by layer. Positive answer of the image has no leg and the scene is about water may lead to the fish final answer while the image has a large subject with four legs may lead to elephant answer. Once the A.I. is trained, it can be asked to create a new creature. A fish-like new creature is much likely to live underwater and without leg based on the training experience. Apply this analogy to painting, to paint like Van Gogh, the A.I. is much likely to select the stroke and style where appears in the Van Gogh paintings. This is different than synthesis one image from another one since the A.I. is using its trained knowledge to create new things rather than patching from the old ones.

Source Input Quality Matter

When human artist paint a portrait, the painting is mixed with 1.) the actual appearance of the subject and 2.) the interpretation of the artist of the subject. However, since A.I. is less capable of understanding the subject, it generally treats everything equally. Thus, some flaw from the scene, like lack of ideal lighting condition, will be captured by A.I. where the human artist can auto correct it when painting.

Segmentation of Subject from Background

Similiar to the previous section, A.I. tends to treat everything in the scene equally. Thus, current A.I. is able to generate high-quality art creation but the subject and the background are all painted artistically. In an ideal setup, the subject should be more focused rather than the background. My reflection on this is a depth map can be generated from the scene based on perspective projection. Then subject can be separated from it. However, we currently use a different approach in iVizLab which I will be covered later.

Where Human is Looking At

To resolve the problem that A.I. is difficult to separate the subject from the background, one approach is focusing on the area where the human attention is usually at. In this case, the A.I. is trained on a special data to allow it predicts if a scene is displayed to a human, where the human will look at most. In general, where the human attention is at is usually the subject or area the artist want to stress. This experiment is done by the help of eye-tracking system.

Not Enough Training Data

One thing special of this research field is usually an artist will only leave so few works through his/her life. Thus, an A.I. cannot be trained efficiently with all these limited examples. One approach we introduce to resolve this problem is training the A.I. by patches from the painting rather than the entire one. In this case, a painting can generate hundreds of 256×256 patches or more if randomness is introduced. Then, the A.I. can be sufficiently trained. However, one problem is if the training is based on patches, the A.I. tends to paint the scene less based on the overall style of the artist which lead to other problems. My reflection is since we are essentially training the A.I. how to mimic a painting style rather than create a new painting style, why not interview the people who are good at fake other artist’s painting?